Here's another national celebration for you: Corn Chip Day. Who knew? I'm coming up a little short, though. I don't have any recipes that call for corn chips (and no, crushed corn chips atop a flavorless casserole at a church potluck does not count). On second thought, I think I recently read that you can use crushed corn chips as a breading for chicken. If you have a recipe, please post it in the comments section.
Cheers!
Thursday, January 29, 2009
Tuesday, January 27, 2009
Ho-Ho Cake
 Today is National Chocolate Cake Day (and my nephew's fifth birthday), so I felt like celebrating. Not content to go with the standard chocolate box cake or even the secret family recipe (that isn't so secret or that phenomenal), I went on the hunt for ways to spruce up a box mix. I narrowed it down to two recipes, one of which is tried and true and other which is an experiment. I presented both options to my husband. "Honey, do you want better-than-sex or ho-ho?" You should have seen the expression on his face. What options! He went with the ho-ho (not sure how to take that!). So, I present to you the Ever So Decadent and Absolutely Sinful Ho-Ho Cake.
Ever So Decadent and Absolutely Sinful Ho-Ho Cake
1 package chocolate cake mix
5 tbsp flour
1 1/4 cups milk
3 tsp vanilla
1/2 tsp almond extract
1 tsp butter flavoring
Dash salt
1 cup sugar
1/2 cup margarine, softened
1 cup shortening
1/2 cup margarine, melted
1 tsp vanilla extract
1 egg or 1/4 cup egg substitute
1 1/2 tsp hot water
1 ounce unsweetened chocolate, melted
1 3/4 cups confectioner sugar
Dash of salt
1. Prepare cake mix according to box instruction. Pour into greased jelly roll pan and spread to the edges. Bake at 350 for 15-20 minutes or until firmly set. Cool completely.
2. Combine flour and milk in saucepan. Cook or medium high heat, stirring constantly, until mixture thickens. Remove from heat, add 3 tsp vanilla, almond extract and dash of salt. Cool completely.
3. Cream 1 cup sugar, 1/2 cup softened margarine, shortening and butter extract. Add cooled milk mixture and beat until fully incorporated.
4. Slice cake into four equal parts. Frost bottom section of cake with cream mixture. Layer the second layer and frost. Repeat with the third layer. Top with the final layer of cake and refrigerate.
5. In a small bowl, beat egg. Stir in vanilla, melted chocolate, hot water, confectioner sugar, 1/2 cup melted margarine and dash of salt until blended. Pour over cake and refrigerate.
Lessons learned: This cake is phenomenally good and yet so bad for you. I had originally hoped to roll the cake, but I baked it for 15 minutes, which wasn't quite long enough for it to hold its form, so I layered it instead. I think I liked the result better anyhow.
On the website where I found the original recipe, everyone complained about how bland the creamed mixture was. I solved that problem with some vanilla, almond extract, butter flavoring and a dash of salt (which I've included in this version of the recipe). I didn't do exact measurements on those, so just play with it until you like the taste. I was amazed at how the milk mixture made the frosting so creamy. I had expected a slight grit from the sugar, but it wasn't there.
For the chocolate frosting, if you're skittish about using a raw egg, go with Egg Beaters. I did. The original recipe didn't call for salt, but I recently read that when cooking with chocolate, a dash of salt will help mellow the bitterness and bring out the true flavor of the chocolate.
I didn't bother refrigerating the cake because I didn't want to wait until midnight to eat it. We will definitely be making this cake again.
Sunday, January 25, 2009
Soft Pretzels
 The other night, the family sat on the floor in front of the idiot box flipping channels. We stopped on Alton Brown's Good Eats on the Food Network and learned a thing or two about popcorn and soft pretzels. (If you've ever watched Alton Brown, you know how zany he is.) Since then, I've been craving soft pretzels. I love the kind you get at the mall, despite the arm-and-a-leg price they charge for that soft, doughy, salty goodness. A little online hunting yielded a recipe that comes pretty dang close to Aunt Annie's. I've tweaked it a little, based on comments from reviewers on the site where I found the recipe. This recipe is labor-intensive, sort-of, but well worth the effort.
Soft Pretzels
1 1/2 cup warm water
1 1/8 tsp active dry yeast (or 1/2 packet of yeast)
2 tbsp brown sugar
3 tbsp melter butter
1 1/8 tsp salt
1 cup bread flour
3 cups all-purpose flour
Soda Bath
2 cups warm water
2 tbsp baking soda
Toppings
Coarse salt to taste
4 tbsp melted butter
Pinch sugar
1. Dissolve yeast in warm water. Stir and let rest for 5 minutes. Add sugar and stir. Add melted butter, salt and flour. Knead dough until smooth and elastic (about 7 minutes in a mixer, longer by hand). Place in greased bowl, turn over to coat dough, cover and let rise for 2 hours or until dough doubles in size.
2. While dough rises, prepare baking soda water bath with 2 cups warm water and 2 tbsp baking soda. Be sure to stir often.
3. Punch down dough. Divide into 12 equal portions. Roll each portion into long ropes (see Lessons Learned for tips), then shape into pretzels. Dip each pretzel into baking soda bath, coating completely, then place on parchment paper on cookie sheet. (It helps to lightly spray the parchment paper with cooking spray.) Let rest for at least 15 minutes.
4. Melt butter in small bowl. Add a pinch or two of sugar, then brush pretzels with butter mixture.
5. Bake at 500 for 8-10 minutes or until golden brown. Brush with more melted butter mixture, top with coarse salt or cinnamon sugar and enjoy.
Lessons learned: I used a dough cutter/wedge to divide the dough in half and then into smaller portions. The first pretzel was difficult to roll out. Don't just make a snake with the dough and then roll it out. It works much easier if you flatten each section of dough into a rectangle and then roll it tightly, as you would a cinnamon roll. From there, use the palms of both hands to gently roll the dough out, forcing your hands farther apart with each pass of the dough. The dough will shrink, but with persistence, it will stretch out. The longer you get it, the closer you'll get to the mall version. Aim for at least two feet per rope.
What's the purpose of the baking soda bath? I'm glad you asked. It is what enables the pretzel to develop that nice brown color on top. Otherwise, the bread isn't in the oven long enough to brown. And who wants to eat an anemic, pasty looking pretzel? (I could go into the ins and outs of acidic and alkaline contents of the bread ingredients, but Alton Brown does a much better job of that, so I'll let you ask him.)If you want an even more uniform brown color, brush the pretzel with an egg yolk water bath just before it goes in the oven. Me? I prefer the taste of butter.
I used my convection oven, which dials down the temperature to 475 with the fan on when I set it to 500. The recipe originally called for 450 for 8-10 minutes, but many reviewers said that wasn't long or hot enough. So, I upped it and was pleased with the results. The pinch of sugar in the melted butter really helps create that mall flavor. The pretzel would be pretty bland without it, I think.
I know this recipe is a keeper because my son's face lit up and he told me that it's as good as the ones in the mall (without me even mentioning my goal to recreate the mall version). And, my husband declared it one of the better bread products I've made.
Saturday, January 24, 2009
Egg and Sausage Casserole
I've been doing a lot of reading about casseroles lately, and not necessarily by choice. It seems that all the main cooking mags are on the same page because casseroles are the "it" thing right now. I've never been a big fan, to be honest. I like my foods somewhat compartmentalized. (I'll blame my childhood phobia of stewed tomatoes in green peppers for that one.) But, there are a few casseroles that get two thumbs up from me. This is one of them. I think every woman (OK, almost every woman) has her version of this recipe. (It turns up at every MOPS meeting I've attended in the past five months.) I've tried several versions, but this is by far my favorite. It came from my dad's co-worker Candice, who frequently brought it to Friday morning potlucks when they both worked for Discover.
Egg and Sausage Casserole
1 lb. ground sausage, cooked
6 slices bread cubed
8 eggs, slightly beaten
1 tsp. salt
1 tsp. dry mustard
1 can cheddar cheese soup
1 ½ cup milk
1 cup cheddar cheese, grated (perhaps a little extra)
1. Grease 7x11 or 9x11 pan.
2. Place meat and bread cubes in pan.
3. Mix together eggs, salt, mustard, soup and cheese. Pour over meat and bread
4. Toss lightly. Refrigerate minimum 10-12 hours.
5. Bake at 350 for 45 minutes (can take longer) until middle is done and knife comes out clean.
Lessons learned: This recipe is pretty forgiving and a good baseline for lots of experimentation. If you want more zing, add several dashes of chipotle Tabasco. For even more zing, use a can of Campbell's nacho cheese soup instead of the cheddar and serve it with salsa and guacamole. Add onions if you like them ... or sauteed mushrooms. I usually up the sausage content since I like sausage. The original recipe said you could use bacon instead, but I like the substance of the sausage. I want to try it with French bread sometime instead of the pillowy stuff you get for less than a dollar in the bread aisle. Going for the healthier version? Use Egg Beaters and turkey sausage. See? I told you it was a very forgiving recipe.
Monday, January 19, 2009
Mapled Chicken and Sweet Potatoes
 This recipe, by its title alone, does not do this dish justice. Nor does the photo. I found a version of this recipe in the February 2009 issue of Real Simple and adapted it to fit my palate (and what I had on hand). It was the ultimate in comfort food. What's more, it was "real simple" to make. The following is what I did for a comfortable portion for two adults.
Mapled Chicken and Sweet Potatoes
2 chicken breasts, trimmed
1 large or 2 small sweet potatoes
1/2 medium onion
1 medium apple
3 sprigs fresh rosemary
2 tbsp olive oil
2 tbsp maple syrup
Salt and pepper
1. Peel and cut sweet potatoes into 1-inch cubes. Cut onion and apple into wedges.
2. Toss potatoes, onion and apple with olive oil, 1/2 tsp salt, 1/4 tsp fresh ground pepper and rosemary. Arrange in small casserole dish (I used a 7x11 Pyrex).
3. Rinse chicken and pat dry. Season both sides with salt and pepper. Cut into large chunks, then fit into casserole dish with the vegetables and apple.
4. Drizzle with maple syrup and roast at 400 for 55 to 60 minutes or until chicken is cooked through. Stir once during cooking.
Substitution Suggestions: There’s no reason why pork wouldn’t also work in this recipe. And, the original recipe called for fresh thyme, not rosemary. And, it didn’t include an apple.
Lessons learned: The apple really does add to the flavor, but it does also increase the liquid content. That was actually a good thing because it made the potatoes incredibly moist and added another level of sweetness to the dish. If you want less liquid, use a larger casserole pan to encourage liquid evaporation.
National Popcorn Day
 I'm having fun learning about all the national days for food. Today is National Popcorn Day. When I was in college, I affectionately referred to popcorn as Lanna's Manna (get it?!). I could eat microwave popcorn morning, noon and night ... and often did if I wasn't in the mood to cook for myself. So today, let's give a shout out to popcorn and try my grandmother's oh-so-good oven caramel corn. It's posted here.
Saturday, January 17, 2009
Thick and Creamy Hot Chocolate
I lived in the Dominican Republic for 18 months during my mid-20s. It was one of the best experiences of my life. In the last place I lived (I moved around a lot), I lived next to a flirty 30-something man named Miguel who loved to share food with me and my companion (I was a missionary). While I was unimpressed with his advances (and his chauvenistic marriage proposal just before I left), I was enamoured of the food he brought. Papaya was a particular favorite. He owned a farm and would sell fresh milk out of his house every morning. He always reserved a small pan of it for me and my companion. This milk tasted unlike any milk I was accustomed to and I didn't like it. But, not wanting to waste his generosity, we devised a way to make it more palatable -- oatmeal hot chocolate. Now I don't recommend this for everyday drinking since it does stick to the bones, but it was sure good. I have adapted the treat for a lighter version. I couldn't give you calorie values, but since I used fat-free milk and fat-free half and half, it can't be all bad, right?
Thick and Creamy Hot Chocolate
1 mug fat-free milk
1 mug fat-free half-and-half
2/3 cup rolled oats
2 tsp vanilla
1/4 tsp almond extract
1/4 cup sugar
2 tbsp cocoa powder
Dash of salt
1. Combine all ingredients in small saucepan over medium-high heat and whisk until cocoa is fully incorporated. Stir and continue to heat until bubbles form around edges, about five minutes.
2. Using a mesh colander, strain chocolate into mugs and discard oatmeal. Top with your favorite hot chocolate toppings.
Serves 2
Lessons learned: If you don't want to bother with the cocoa and sugar (and the cocoa takes some effort to incorporate), use a hot chocolate packet and omit the cocoa and sugar. You could probably omit the vanilla and salt, too, but I haven't tried it that way in more than 10 years, so you're on your own for that. If you feel that chucking the oatmeal is a waste, find a toddler and feed it to him or her. It was a hit with my 20-month-old daughter.
I didn't include a picture because one mug of hot chocolate looks just like the next mug of hot chocolate. It was, however, much thicker and creamier than the recipe I tried last weekend that called for cornstarch. I love the smoothness that the oatmeal gives to this recipe. And since it's a grain, it's healthy, right?!
Friday, January 16, 2009
National Oatmeal Month
I just found out that we are celebrating National Oatmeal Month. Anyone got any good oatmeal recipes? When I lived in the Dominican Republic, we made oatmeal shakes and oatmeal hot chocolate. That stuff sticks to your ribs. I recently tried a hot chocolate recipe that called for cornstarch. It didn't do anything special for me (which is why I didn't post it). Maybe I'll have to make some oatmeal chocolate in the morning and pay attention to proportions so I can post the recipe. Stay tuned.
By the way, Jan. 6 was National Bean Day. Stay tuned for upcoming holidays: National Popcorn Day (Jan. 18), National Buttercrunch Day (Jan. 19), National Blonde Brownie Day (Jan. 22) and National Pie Day (Jan. 23). And lest you crave more sweets, Jan. 27 is National Chocolate Cake Day. If you prefer something savory, Jan. 29 is National Corn Chip Day. And all month long, we're also celebrating National Soup Month and Hot Tea Month. Oh, the recipes that abound for these holidays!
By the way, Jan. 6 was National Bean Day. Stay tuned for upcoming holidays: National Popcorn Day (Jan. 18), National Buttercrunch Day (Jan. 19), National Blonde Brownie Day (Jan. 22) and National Pie Day (Jan. 23). And lest you crave more sweets, Jan. 27 is National Chocolate Cake Day. If you prefer something savory, Jan. 29 is National Corn Chip Day. And all month long, we're also celebrating National Soup Month and Hot Tea Month. Oh, the recipes that abound for these holidays!
Pavlova
 When my husband and I got married, a group of wonderfully talented women assembled an album of recipes for us. I say album because these recipes were scrapbooked onto 6x6 pages. I definitely have some favorites: cranberry and apricot pork tenderloin and chicken pillows readily come to mind (I will post them ... eventually). One of the most intimidating recipes in that three-album collection was a pavlova. I had never even heard of it, but it looked delightful!
After making creme brulee earlier this week, I had leftover egg whites that needed to be used or tossed. Pavlova, which is essentially the Australian take on a meringue, seemed the perfect fit, so I looked up some information on the confection and pulled out the Bosch to whip up some whites. While the recipe in my album is not the recipe I used yesterday, it was the inspiration. Below is the recipe, from elise.com, that I tried. I really liked the step-by-step instructions and accompanying photos that went with it. I am not yet coordinated enough to cook and snap photos at the same time. Eventually. In the meantime, here's pavlova, an Australian dessert inspired by the Russian ballerina Anna Pavlova.
Pavlova
Meringue:
1 1/2 teaspoons pure vanilla extract
1/2 teaspoon cream of tartar OR 2 teaspoons white wine vinegar OR distilled white vinegar
1 1/2 tbsp cornstarch
1 1/2 cups granulated sugar
3/4 cup (6 ounces, about 6) large egg whites at room temperature
Pinch salt
Topping:
2 pints fresh or frozen berries
1/4 cup sugar
Whipped cream
1. Preheat oven to 275. Line large baking sheet with parchment paper. Draw 8 to 10 3-inch wide circles on the parchment paper, then turn over the paper. Pour the vanilla and vinegar (if using) into a small cup. Stir the cornstarch into the sugar in a small bowl.
2. In a large bowl of a heavy-duty mixer, fitted with whisk attachment, whip egg whites, cream of tartar (if using) and salt, starting on low, increasing incrementally to medium speed until soft peaks/trails start to become visible, and the egg white bubbles are very small and uniform, approximately 2 to 3 minutes.
3. Increase speed to medium-high, slowly and gradually sprinkling in the sugar-cornstarch mixture. A few minutes after these dry ingredients are added, slowly pour in the vanilla and vinegar (if you didn't use cream of tartar.) Increase speed a bit and whip until meringue is glossy, and stiff peaks form when the whisk is lifted, 4 to 5 minutes.
4. Pipe or spoon meringue into 8-10 large round mounds using the pencil drawings as your guide. With the back of a spoon, create an indentation in the middle of the mound for holding the filling once meringue is baked.
5. Place baking sheet in the oven. Reduce oven temperature to 250. Bake for 50-60 minutes, or until the meringues are crisp, dry to the touch on the outside, and white -- not tan-colored or cracked. The interiors should have a marshmallow-like consistency. Check on meringues at least once during the baking time. If they appear to be taking on color or cracking, reduce temperature 25 degrees, and turn pan around.
6. Gently lift from the baking sheet and cool on a wire rack. Will keep in a tightly sealed container at room temperature, or individually wrapped, for up to a week if your house is not humid.
7. Served topped with your favorite filling - lemon curd, raspberry or blueberry sauce, and freshly whipped cream.
Sauce or Filling Directions
For a berry sauce, heat a couple pints of fresh or frozen berries in a medium saucepan with about a quarter cup of sugar. Heat on medium heat, stirring once or twice, for about 5 to 10 minutes, depending on how much the berries are falling aprt. Remove from heat and let cool.
Lessons learned: If you are intimidated by meringue, like I was until yesterday, the pictures that go with the link really do help. I have not posted them here because I don't want to deal with the copyright police. I used the cream of tartar option and the meringue behaved just like the instructions. Make sure that your bowl does not have a speck of oil in it. If it does, your eggs will not beat properly. Ideally, you should beat egg whites in a copper bowl -- a chemical reaction happens that yields a better beaten white than the same effort in other bowls.
I cooked the meringue a little longer than the prescribed amount of time and once it was done, I turned the oven off and let them cool in the oven. I did turn the pan partway through the cooking to just make sure it didn't burn.
The pan does not need to be greased, but you must use a gentle hand to remove the meringues. Otherwise, they will crack or fall apart. Also, I had more meringue than I could fit on one pan, so I threw the rest out.
The meringues will expand during cooking, so make sure your circles are not too close together. You do NOT want them to stick together. It ruins the beauty of the outer crust.
You can make this into one big dessert (which requires a longer cooking time), but I opted for the smaller ones. I stored the leftovers in zippered bags, then shared some this morning with two friends. Perhaps it was tacky, but I gave each of them a pudding cup to put on top of the meringue (the berries just wouldn't transport well and I didn't have whipped cream).
I like a sweeter berry, so I loaded up on sugar with my raspberries. It was still too tart and runny for my liking. If you want a thicker sauce, I suggest adding a cornstarch mixture into the berries if the sauce gets too watery.
I poured chocolate and caramel sauces over my son's dessert and he loved it. Chocolate also worked well with the raspberries (but then, chocolate goes with just about everything).
Monday, January 12, 2009
The Best (and Easiest) Homemade Bread
 I love bread; but not just any bread. It has to be fresh out of the oven, piping hot, perfectly browned yeast bread. I've read more books on bread in the past four months than most people do in two lifetimes. Peter Reinhardt is THE MAN when it comes to bread! (Google him!) I've learned a lot along the way and intend to keep learning. I've recently entered the world of sourdough breads and am loving the experience. All that souring goodness does a body good. I've learned a thing or two about hooch, too, since I started playing with starters and reading about the proper feeding and caring of sourdough. The following recipe is my go-to recipe whenever I need a "quick" loaf. It's not quick, but it always delivers. And, seeing the smile of friends faces when a loaf shows up on their door -- what more could you ask for? OK, maybe a little butter and cinnamon sugar to go with it. Enjoy!
The Best (and Easiest) Homemade Bread
Yields 2 loaves
2 Cups warm water
2 Packets yeast
4 Tbsp sugar (heaping)
4 Tbsp shortening (heaping)
2 Tsp salt
Flour
1. Combine water and yeast. Let sit for at least 5 minutes or until mixture begins to bubble/foam.
2. Add sugar, some flour (about 1 cup) and shortening. Mix well. Continue adding flour until batter forms about the consistency of pancake batter.
3. Add salt. Continue adding flour until the dough is no longer sticky and pulls away from sides of bowl. Knead approximately 8 minutes or until the dough stretches and doesn’t tear when you pull it apart (the window pane test).
4. Cover with warm damp towel and let rise in warm place until double (about an hour). Punch down, shape into loaves and place in greased pan. Cover and let rise again.
5. Brush top with cooking spray or melted butter and bake at 350 for 30 minutes or until golden.
Substitutions: For wheat bread, substitute honey for sugar and oil for shortening and bake at 375 for 40 minutes or until golden. Your crust will be darker than if you use white flour. I like to add in at least a cup or two of wheat flour to my white flour bread.
Lessons learned: The recipe doubles very well. And, it takes no more effort to bake three or four loaves as it does to bake two. What's more, your neighbors will LOVE you!
For cinnamon bread, incorporate ground cinnamon into the loaf or spread cinnamon, sugar and a little butter on a rolled-out piece of dough, then roll up for a cinnamon swirl loaf. If you want to add raisins, roll them in with a swirl. If you incorporate them into the dough, the exposed raisins in the crust will burn during baking.
The recipe also works well for cinnamon rolls and fried scones (Indian fry bread).
You can get decorative with the top of the loaf. To get a fuller bloom (higher rise), cut shallow slashes into the dough before you bake it. This gives the bread the opportunity to rise just a little bit more during the baking process. The buttered top gives you a softer crust.
Garlic-Parmesan Chicken
I love panko bread crumbs. If you've never used them, run out to the store right now and get some. Seriously, they're brilliant! Unlike regular bread crumbs, this Japanese version stays crispier and gives you a nice crunch in the mouth without the guilt on the thighs. See? What's not to love. I served chicken medallions breaded in panko. It was a little paler than I would have preferred, but I can readdress that later by broiling the chicken for the last minute or two.
Garlic-Parmesan Chicken
3 chicken breasts, trimmed
1/4 cup butter, melted
2 cups panko bread crumbs
1 tsp dried parsley
1/3 cup parmesan cheese, grated
2 tsp garlic powder
1. Trim fat from chicken breasts and slice into even strips.
2. Combine panko, parmesan cheese and garlic powder into bowl and stir.
3. Dip chicken pieces into melted butter, then into panko mixture.
4. Place on greased cookie sheet or parchment-lined sheet and bake at 400 for 15 to 20 minutes or until chicken is just cooked through.
Lessons learned: I actually cut the chicken into medallions using a sharp circular cookie cutter. I'll use the remants for something else. The parmesan is pretty salty, so I omitted salt. Give it a try and then decide if it needs salt. I topped it with a tomato cream sauce, which I will also post. Like I said before, I will broil the chicken for the last minute to help brown the panko a little more. The original recipe, from which I based this adaptation, called for sauteeing minced garlic in the butter and not using garlic powder. This version is easier, though perhaps a little blander.
Roasted Brussels Sprouts and Mushrooms with Hot Bacon Dressing
 Yesterday, two friends and I discussed when we would go out to lunch again. We went out just before Christmas and had a great time. It was time to meet up again. I volunteered the Bristow Bistro as the meeting place. They kindly accepted and I began a frantic quest to come up with brunch-able food. Since I don't shop on Sundays, it limited what I could do (unless, of course, I made an early run to the grocery store on Monday, which is what I ended up doing). So, here's what was on this morning's menu: Roasted brussels sprouts and mushrooms with hot bacon dressing, garlic-parmesan chicken patties with creamy tomato sauce, corn and sun-dried tomato creme brulee, and fresh cinnamon bread.
Roasted Brussels Sprouts and Mushrooms
1 bag frozen brussell sprouts
4 oz. fresh mushrooms
2 tbsp olive oil, divided
1 tsp salt, divided
Hot bacon dressing (below)
1. Slice brussels spouts in half along the length of each vegetable. Toss with 1 tbsp olive oil and 1/2 tsp salt.
2. In separate bowl, quarter mushrooms and toss with remaining olive oil and salt.
3. Roast brussels sprouts on large sheet at 400 degrees for 20 minutes, gently stirring midway through. Add mushrooms to the sheet and continue roasting for another 10 minutes or until brussell sprouts and mushrooms develop healthy brown color.
4. Just before serving, crumble bacon from dressing recipe into brussels sprouts and mushrooms. Stir. Spoon 1/4 cup of dressing over mixture and gently stir until until fully incorporated. Serve hot.
Hot Bacon Dressing
4 strips bacon
1/2 cup red onion, diced
2 tbsp flour
2 tbsp sugar
1/2 tsp celery seed
1/2 tsp salt
Dash pepper
1/4 cup cider vinegar
1 1/2 cups water
1. Cook bacon until crisp. Set aside and drain.
2. Using 1 to 2 tbsp of bacon fat, saute diced onion over medium heat until tender.
3. Meanwhile, combine flour, sugar, celery seed, salt and pepper. Stir, then add to onion mixture. Stir until liquid is incorporated. Add cider vinegar and continue stirring.
4. Gradually add water, several tablespoons at a time until the dressing thickens and bubbles. Continue to add water until you reach your desired consistency. Correct seasonings if necessary.
Lessons learned: The dressing recipe will make more than you need for one bag of frozen brussels sprouts. I don't think it'll keep well, though, so just get rid of what you don't use. The bacon really does need to go in just before serving ... unless you like soggy bacon, which I do not. There's no reason why this recipe could not also work with broccoli, cauliflower or atop a spinach or potato salad. I like the extra hint of flavor that comes from using cider vinegar, but if you don't have any, regular white vinegar will work just as well. I suppose you could use oil instead of bacon renderings and just add bacon bits instead of freshly cooked bacon, but I really like the smokiness and love that come from the real thing.
Saturday, January 10, 2009
Chicken and Barley Soup
 While we were in California, my good friend Carrie served us a delightful chicken and barley soup. Knowing her propensity to make things up as she goes, I didn't ask for the recipe, but took it upon myself to make up one similar. We enjoyed for dinner last night and for lunch this afternoon. This recipe is definitely a winner in our house (which is saying something since I don't typically like broth-based soups).
Chicken and Barley Soup
2-3 chicken breasts, cubed
2 tbsp olive oil
1/4 tsp dried red pepper, crushed
6 cloves garlic, minced
7 cups chicken or vegetable broth, divided
1 1/2 cups carrots, chopped
1 cup celery, chopped
1 sweet potato, chopped
1 small onion, diced
1/2 tsp rosemary
1 tsp tarragon
1 tsp salt
1 tbsp basil
Dash of dill
Dash of cinnamon
Splash of sherry
1 cup pearled barley
1. In dutch oven pan, heat olive oil. Add chicken and saute for approximately five minutes, but do not cook through. The chicken should start to brown slightly. Add crushed red pepper and garlic. Saute another 30 seconds to one minute, taking care not to burn the garlic. The garlic should be very fragrant.
2. Add 3 cups broth and reduce heat. Add chopped carrots, celery, sweet potato and onion. Add rosemary, tarragon, salt, basil, dill and cinnamon. Bring to a gentle simmer. Add sherry.
3. Add barley and 3 cups broth. Simmer over low heat until the barley plumps, the vegetables become tender and the chicken is cooked through. Add more broth if you want a more liquid soup.
4. Adjust seasonings to taste and serve with French sourdough.
Lessons learned: I really tried to keep track of what I put in the pot as I went. The more time I spend the kitchen, the more I learn about spices. I tend to overdo the "parsley, sage, rosemary and thyme" (do you have a song stuck in your head now?) in my soups. This time, I went through my spice rack, sniffing each spice before it went in the pot. I really liked the slight mintiness of the tarragon. And to me, it's an unexpected flavor. I think sage and thyme would ruin it; make it too Thanksgiving-y.
The sherry was an afterthought. But, I love the hint of sweetness it added. I only used 2 tablespoons at most.
I'm not sure the cinnamon did anything, but again, it was something different.
If you don't like spicy heat, omit the red pepper, or cut back on it. It does leave a little zing at the back of your throat.
The beauty of barley, aside from its health benefits, is that it adds great texture to the soup. And, it soaks up tons of flavor and liquid. As such, the broth measurement here is just an estimate. I used at least seven cups of broth (mixing canned broth and low-sodium bullion with water). When I served it for lunch, the barley had soaked up even more liquid overnight, so I added another cup of hot water. It did not noticeably dilute the flavor at all.
I probably let the soup simmer a good hour before serving it (partly because I was waiting on the bread to bake). I like the flavors melded together so well and that the chicken was so tender.
I suppose you could substitute beef for the chicken. Also, I meant to saute the carrots, celery and onion along with some mushrooms before I added the broth. It helps release more flavor, I think. Maybe next time, because there definitely will be a next time with this one.
5-Minute Chocolate Mug Cake
 This recipe comes courtesy of my friend Suzie. She received it as a forwarded e-mail. I've tried it twice, and though it still needs a little tweaking, it does satisfy a Saturday-afternoon chocolate craving.
5-Minute Chocolate Mug Cake
4 tbsp flour
4 tbsp sugar
2 tbsp cocoa
1 egg
3 tbsp milk
3 tbsp oil
3 tbsp chocolate chips (optional)
Small splash vanilla extract
1 large coffee mug
1. Add dry ingredients to mug and mix well. Add the egg and mix thoroughly.
2. Pour in the milk and oil. Mix well.
2. Add the chocolate chips (if using) and vanilla extract. Mix again.
3. Put your mug in the microwave and cook for 3 minutes at 1000 watts. The cake will rise over the top of the mug, but don't be alarmed!
4. Allow to cool a little, and tip out onto a plate if desired. (This can serve 2 if you want to feel slightly more virtuous).
Lessons learned: Lots of comments on this one. I used Egg Beaters in my recipe so I could do a half-recipe in a smaller mug (otherwise, how do you gracefully split half of one egg?). I added chocolate chips to both mugs, but in the future, I think I'll omit them. They don't add anything special and they disrupt the integrity of the cake, in my opinion. Also, I tried one with a splash of almond extract and the other with a splash of mint extract. The mint gets my vote. If you use a smaller mug (I used a Corelle mug), halve the recipe and nuke for two minutes, not three. My microwave is a 1500-watt nuker. I couldn't figure out how to cook it on a lower watt. If I had, perhaps the cake would have been a little springier and less dense. Maybe next time. If I were serving this to guests, I'd leave it in the mug and top with either whipped cream or a scoop of ice cream. It looks funny and slightly unappetizing when you dump it out onto a plate.
Thursday, January 8, 2009
Pear and Blue Cheese Pastry Triangles
The moment I read this recipe in the November 2005 issue of Sunset magazine, I knew I had to give it a try. And since they disappeared quickly when I served them the first time, darn it, I had to make them again ... just to make sure I really did like them. And, I keep making them. They are a little labor intensive, but the sweet-savory blend is definitely worth it. If you need an impressive appetizer for a get-together, this will definitely fit the bill. Thank you, Sunset magazine!
Pear and Blue Cheese Pastry Triangles
3 tbsp. butter
1 tbsp. olive oil
4 sweet or yellow onions (2 lbs.), thinly sliced
1 firm-ripe pear, cut in thin wedges
Salt and pepper
2 sheets puff pastry, thawed but cool
7 ounces (1 1/2 cups) crumbled gorgonzola
1. In frying pan, melt butter with olive oil. Add sliced onion and set heat between medium and medium-low. Cook, stirring occasionally, until the onions caramelize, 30 to 40 minutes. When done, sprinkle with salt and pepper to taste. Set aside to cool.
2. Trim and core the pear quarters, cut into thin slices.
2. Preheat oven to 375. Line two cookie sheets with parchment paper. Using floured rolling pin, roll one sheet of pastry onto each pan to flatten any creases.
3. Cut the pastry sheets into triangle, wedge, or diamond-shaped pieces about 2 inches wide (don't worry if you cut through parchment). Slightly separate pieces so they don’t touch.
4. Lay a pear slice in the center of each wedge (trim slice so it doesn't cover the entire pastry). Top with a small pile of caramelized onions and about 1/2 tsp. gorgonzola.
5. Bake in oven until fully puffed and golden, 25 to 30 minutes. Serve warm.
Lessons learned: Pears are cored easily with a melon baller (if only I had learned that trick years ago!). The pears really do need to be trimmed down. If you leave them large, the pastry can get soggy and will not puff correctly. You can omit the blue cheese ... but why? I get 18 triangles out of one sheet of Pepperidge Farm puff pastry sheets.
World's Best (and Easiest) Brownies
This is, hands down, the best (and easiest) basic brownie recipe out there. I think it came out of my mom's red Betty Crocker cookbook, which was likely a wedding present when my parents got married back in the Dark Ages. At any rate, the recipe is incredibly easy and always comes out well (as long as the oven is up to temperature, which I had problems with once and ended up with raw brownies. Brownie batter is yummy, but not what you're expecting cooked brownies and serving them to a husband's co-worker/friend).
Brownies
2 eggs
1 cup sugar
¼ cup cocoa powder
4 tbsp shortening
4 tbsp butter
¾ cup flour
¾ cup nuts (optional)
2 tsp. vanilla
1/8 tsp baking powder
1. Melt shortening and butter, then add sugar.
2. Add all other ingredients, adding eggs on and a time and incorporating before adding the next one. Mix until combined.
3. Bake at 350 degrees for 30 minutes in greased glass dish.
Lessons learned: A few drops of almond extract and mint chocolate chips are really good in this recipe. So are chocolate chips. And I bet toffee bits would be tasty, too. The only thing that didn't work well in this recipe are marshmallows.
I usually double the recipe and up the cooking time by almost 20 minutes. They still stay soft and delicious. If I double the recipe, I use a Pyrex casserole dish. A single batch will fit comfortable in an 8x8 pan.
Party Punch without the Hangover
I don't drink. Never have. Never will. So, when I need a tasty party beverage, this is my go-to recipe. I can't remember where it came from, but it was a hit at a baby shower I threw a few years ago and at a Super Bowl party last year. You need to plan ahead for this one, though. It's definitely not a last-minute, throw together recipe.
Party Punch without the Hangover
2 3-oz packages fruit-flavored Jell-o
2 2/3 cups and 1 tbsp sugar
8 3/4 cups boiling water
1 1/3 (46 fluid oz) cans pineapple juice
2/3 (16 oz) bottle lemonade
1 1/3 (2 liter) bottles ginger ale, chilled.
1. In a large bowl, combine gelatin and sugar. Stir in boiling water until mixture dissolves. Stir in pineapple juice and lemonade concentrate. Divide into two freezable containers and freeze until solid.
2. To serve, place gelatin mixture in large punch bowl and chop into pieces. Add chilled ginger ale and serve.
Lessons learned: I used red-colored Jell-o--watermelon and raspberry. You don't need to use two boxes of the same flavor.
Chicken and Sausage Casserole
It's cold in Virginia right now, which means I'm totally up for comfort food. While this casserole isn't the most exciting dish ever created, it fits the bill (at least in my mind) as comfort food. What's more, it's a staple from my childhood. So, thanks Mom, for sending me this recipe. It's a hit in our house.
Mom Carter's (Not So Famous) Chicken and Sausage Casserole
1 cup white rice
1 package Lipton Chicken Noodle Soup
4 1/2 cups water
1/2 bell pepper
1 onion, chopped
1/2 bunch celery, chopped
1 can tuna or chicken
1 to 2 pounds sausage, cooked and crumbled
1. Brown and crumble sausage. Drain. Add onion, celery and green pepper.
2. Combine soup mix and water. Cook for five minutes.
3. Combine sausage, soup and raw rice in casserole dish. Add chicken or tuna.
4. Bake at 350 until rice is done (between 45 minutes and 1 hour). Stir partway through cooking to avoid over-browning the casserole.
Optional add-ins:
Raw ramen noodles (no seasoning packet)
Curry powder
Lessons learned: To cut baking time, partially pre-cook the rice and then reduce the water by the amount used to cook the rice. I found some low-fat sausage that doesn't have any grease to drain. Also, I omit the bell pepper since my family doesn't like it. The ramen, though, is a must! If you don't have Lipton soup mix, use a low-sodium chicken bullion powder or the chicken-flavored ramen seasoning packet.
Peach Cinnamon Whirligigs
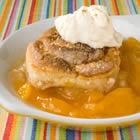 One of the first things I ever attempted to make as a child were Peach Cinnamon Whirligigs. The recipe came from a well-worn pamphlet sandwiched between Mom's Betty Crocker cookbook and her recipe box. I admit that the first try took about two hours and involved lots of questions (I was probably eight at the time). I've since perfected the prep time and can now do it in about 15 minutes. This recipe works well as a breakfast or a dessert. The Bisquick yields a pleasantly crumbly cinnamon roll unlike the yeasty versions. If you have home canned fruit available, try that instead of store-bought. I always double the recipe since it disappears quickly.
Peach Cinnamon Whirligigs
2 28 oz. cans peaches with syrup
2 tbsp cornstarch
1 tsp cinnamon
1 tsp vanilla
1 1/3 cups Bisquick
2 tbsp sugar
1 tbsp butter, melted
1/3 cup milk
2 tbsp butter, softened
1/4 cup sugar
1 tsp cinnamon
1. Combine cornstarch and 1 tsp cinnamon in glass. Add enough water to dissolve the cornstarch (no more than 1/2 cup). In a medium saucepan, combine peaches (with syrup), cornstarch mixture and vanilla.
2. Cook, stirring constantly over medium heat until mixture thickens and boils. Boil and stir 1 minute.
3. Mix Bisquick, 2 tbsp sugar, 2 tbsp melted butter and milk to form soft dough. Gently smooth dough into a ball on well-floured board. Knead 8 to 10 times (add extra Bisquick or flour if it's too sticky).
4. Roll dough into 9-inch square. Spread with 2 tbsp softened butter. Mix 1/4 cup sugar and 1 tsp cinnamon. Sprinkle over dough. Roll up; seal well by pinching edges of dough.
5. Pour peach mixture into square 8x8 pan. Cut roll into 1-inch slices, place cut side up on hot peach mixture.
6. Bake at 425 degrees for 20-25 minutes. Serve warm with cream or ice cream.
Lessons learned: If your pan is more than half full when it goes into the oven, put a cookie sheet underneath the pan. Otherwise, you risk having to clean up the burned syrup from the bottom of your oven.
Tuesday, January 6, 2009
Peppermint Smore Cups
Do you have a half tub of CostCo or Trader Joe's peppermint bark still sitting in your pantry from Christmas? I do. So, I combined a family favorite dessert with pepperminty goodness for a twist on a classic treat.
Peppermint Smore Cups
4 graham crackers
1-2 tbsp sugar
2 tbsp melted butter
1 1/2 cups mini marshmallows
1/2 cup peppermint bark, chopped
1. Crush graham crackers. Add sugar and melted butter, then press mixture into ramekins.
2. Divide marshmallows and peppermint bark evenly between the dishes. Add more marshmallows and chocolate according to your preference.
3. Bake in 375 degree oven until marshmallows start to brown (approx 10 minutes).
Lessons learned: All measurements are approximate. You can use marshmallow cream instead of mini or jumbo marshmallows and it works just fine. Just layer the chocolate underneath. Also, we normally do this with milk chocolate chips. I tried it using sugar cone bowls and it worked just fine; but beware, do not put the bowls under the broiler. They will burn too quickly.
Monday, January 5, 2009
Strawberry Balsamic Chicken
I love those websites that allow you to punch in the ingredients you have on hand, then choose from a list of recipes with those ingredients. I once learned how to make a berry chicken dish (berry glaze over chicken) that was really good, so I thought I'd try something similar with just strawberries. I found a strawberry yogurt marinade, but since I didn't have strawberry yogurt nor did I want to wait 24 hours to let it marinade, I had to make do. Here's how it played out (measurements are anything but exact since I made this up):
Strawberry Balsamic Chicken
1 cup strawberries (I used the frozen kind)
1/3 cup balsamic vinegar (I used the good/expensive stuff from Williams Sonoma. YUM!)
1/4 cup sugar
1 cup lemon lime or ginger ale soda (I suppose chicken stock or water would also work)
Salt and pepper to taste
1. Saute small chicken breasts (I cut a really big piece into four smaller pieces) so that they are nicely browned. I brushed each piece with a little salt, lemon juice and olive oil before putting it on the hot pan to sear.
2. Whip marinade ingredients together in a blender, adding more liquid or sugar as necessary to thin it out and sweeten it up. Don't make it too watery, though. Heat to take off the chill. Pour over sauted chicken, then bake at 400 for 15 minutes or until chicken is cooked through.
It works well with pine nut/sun-dried tomato couscous on the side.
If you try it, let me know what you think.
Parmesan Thins
This recipe came from a cookbook of appetizers. My family loves these tasty, savory cookies. The recipe is worth sharing and the recipe should definitely be doubled. Enjoy!
Parmesan Thins
1/2 cup all-purpose flour
3 tbsp butter, softened
1 egg yolk
2/3 cup grated Parmesan cheese
Pinch of salt
Pinch of mustard powder
1. Rub together the flour and butter in a bowl using your fingertips, then work in the egg yolk, Parmesan cheese, salt and mustard powder. Mix to bring the dough together into a ball. Shape the mixture into a log, wrap in foil or plastic wrap and chill for 10 minutes.
2. Preheat oven to 400 degrees. Cut the Parmesan log into very thin slices, 1/8 to 1/4 inch thick maximum, and arrange on a baking sheet. Flatten with a fork to give a pretty ridged pattern. Bake fro 10 minutes, or until the Parmesan thins are crisp but not changing color.
Sunday, January 4, 2009
Herbes de Provence Chicken
A year ago, I attended a friend's Christmas party and she served the most delightful herbed chicken dish. I begged for the recipe, but she made it up as she went, so I was left to my own devices to recreate it. Here is my attempt (which is admittedly pretty good, if I do say so myself!).
Herbes de Provence Blend
Adapted from a recipe found in Real Simple Magazine
1 tbsp dried thyme
1 tbsp dried basil
1 tbsp dried rosemary, crushed
1 tbsp dried tarragon
1 tbsp dried savory
1 tsp dried marjoram
1 tsp dried oregano
1/2 tsp dried mint
1 bay leaf, crushed
Herbes de Provence Chicken
4 chicken breasts
1 tbsp herbes de Provence blend
2 cloves garlic, minced or crushed
2 tbsp olive oil
1 1/2 tsp salt
1/2 tsp freshly ground pepper
1. Cube chicken into 1-inch pieces.
2. Toss with herbes de Provence blend, garlic, olive oil, salt and pepper. Marinade for at least one hour.
3. Bake in small casserole dish at 400 degrees for approximately 30 -40 minutes or until chicken begins to brown on top and is cooked through.
Notes: I cube the chicken while it is still partially frozen. Be careful, though, because you may end up with too much liquid in the dish, which doesn't affect the taste, but is slightly less appealing from a plating perspective. My friend added juniper berries and white wine to her version. I haven't tried these additions (more out of forgetfulness than anything), but if juniper berries are hard to come by, I think capers would be a nice substitute. This is wonderful served with potatoes roasted with a similar spice blend.
Saturday, January 3, 2009
Savory Pizzelles with Chicken Carbonara Filling
 I have craved pizzelles for about six months, but told myself I could not buy a pizzelle iron until we moved to a bigger house. Knowing my husband has a difficult time finding Christmas gifts for me, I put this at the top of my one-item list and hoped it would show up under the tree. I was not disappointed. We christened it this evening with savory parmesan-basil crackers. The aroma permeated the house in a pleasant sort of parmesan-y way. The results were tasty and worth a repeat in the near future.
Savory Pizzelles
3 large eggs
1/2 cup + 1 tbsp butter, melted
1 cup flour
1/3 cup grated parmesan cheese
1/2 tsp garlic powder
2 tsp baking powder
3 tbsp basil, finely snipped
1/2 tsp salt
1/8 tsp freshly ground pepper
1. In medium bowl, beat eggs with butter until blended. (Depending on the egg temperature, it may congeal the melted butter slightly.)
2. Stir in remaining ingredients until blended.
3. Preheat pizzelle iron. Drop batter into iron according to manufacturer's instructions. I used about 2 tsp of batter for each pizzelle. When you place the batter, place it slightly "behind" the center. The batter will ooze towards a centered cracker and will have a more uniform thickness.
3. Remove pizzelle from iron and wrap around cannoli form. Do not remove each cracker until you are ready to wrap it. They harden quickly.
Notes: You can make pizzelles up to one week ahead of serving; 1/2 hour before serving, preheat oven to 250 degree. Wrap pizzelles in aluminum foil; heat in oven until warm. Butter burns faster than margarine, so if you want a crunchier cracker, go with butter. For a Mexican flair, omit the parmesan and basil. Add queso fresco and cilantro. For Asian flavoring, add basil and curry or Chinese five-spice. Be creative.
Chicken Carbonara Filling
3 tbsp butter
3 tbsp flour
1 clove garlic, minced
3/4 cup shredded chicken, cooked
1/4 cup crumbled bacon
3 tbsp basil, finely snipped
1/4 cup grated parmesan cheese
Dash salt and pepper
Milk
1. Melt butter in medium saucepan. Add flour and stir until the mixture forms a paste.
2. Over medium heat, slowly add a tablespoon of milk. Stir. Continue slowly adding milk until your rouex reaches a thick gravy consistency.
3. Add chicken, bacon, basil and parmesan. Stir.
4. Add salt and pepper to taste.
This recipe could work well as an appetizer or main dish. If you want a Mexican flair, omit the bacon, basil and cheese. Add corn, beans, chili or chipotle powder, olives and sun-dried tomatoes. For an Asian flavor, use a curry sauce instead of a cream sauce.
Thursday, January 1, 2009
Balsamic Poached Chicken
 This recipe is super easy, healthy and tasty. One lesson learned, though. It's MUCH better with a good quality balsamic, like what you'd find at Williams Sonoma. The second time I made it, I used a cheap balsamic vinegar. I did not get the deep color on it like I did when I made it the first time with the good stuff. And, the flavor wasn't nearly as good. It says that the vinegar will reduce in with about 10 minutes of boiling. It does not. If you want to thicken the sauce, you'll need to use corn starch, though that will affect the texture.
Balsamic Poached Chicken
Real Simple Magazine
1 pound new potatoes, halved or quartered
3 tablespoons olive oil
1 teaspoon kosher salt
1/4 teaspoon black pepper
1 pound asparagus, trimmed
1 14.5-ounce can low-sodium chicken broth
1 cup balsamic vinegar
1 1/2 pounds boneless, skinless chicken breasts
Heat oven to 400° F.
Place the potatoes in a roasting pan. Drizzle with the oil. Season with 3/4 teaspoon of the salt and the pepper, and toss. Roast for 30 minutes, shaking the pan once. Add the asparagus to the pan with the potatoes, season with the remaining salt, and toss. Roast until the asparagus is tender, 12 to 15 minutes.
Meanwhile, in a saucepan, bring the broth and vinegar to a boil. Rinse the chicken and pat it dry with paper towels. Pound the chicken to an even thinness. Add the chicken and, if necessary, enough water (up to 1/2 cup) to cover it. Simmer for 1 minute. Cover, remove from heat, and set aside until cooked through, about 15 minutes. Transfer the chicken to a cutting board. Return the liquid to medium-high heat and simmer until reduced to about 1/3 cup, about 10 minutes. Thickly slice the chicken. Divide the ingredients among individual plates. Drizzle with the balsamic mixture.
Tip: The pungent smell of simmering vinegar can linger long after you remove the pan from the stove. To reduce the odor, open the windows or turn on a fan early in the cooking process.
Yield: Makes 4 servings
CALORIES 440 (28% from fat); FAT 13g (sat 2g); SUGAR 11g; PROTEIN 47g; CHOLESTEROL 100mg; SODIUM 600mg; FIBER 4g; CARBOHYDRATE 32g
Pistachio-Crusted Salmon
I don't watch much TV. If I sit down to watch live TV (meaning something not pre-recorded by me), it's usually the Food Network. A few months ago I caught a segment that featured pistachio-crusted tilapia. It sounded so good that I looked up the recipe and gave it a whirl (with a few substitutions, of course). It was a success. Cooking note: I used salmon and unsalted, unroasted pistachios. If you used salted pistachios, cut back on the salt. So without further ado, here's the recipe. Bon apetite!
Pistachio-Crusted Tilapia (or Salmon) with Chard, Flash-Fried Prosciutto, Gorgonzola and Pine Nuts
Copyright, 2006, Robin Miller, All rights reserved
1 cup shelled pistachios
1 teaspoon dried oregano
1 teaspoon dried thyme
1/2 teaspoon garlic powder
4 tilapia fillets
Salt and freshly ground black pepper
3 tablespoons honey mustard
1 1/2 tablespoons olive oil, divided
4 ounces prosciutto, diced
4 tablespoons pine nuts
6 cups fresh chard leaves
1/4 cup crumbled Gorgonzola or blue cheese
In a food processor, combine pistachios, oregano, thyme, and garlic powder. Process until finely chopped and transfer to a shallow dish. Season both sides of fish fillets with salt and pepper. Brush honey mustard over both sides of fish and then transfer to pistachio mixture. Press mixture into both sides of fish.
Heat 1 tablespoon of the oil in a large skillet over medium heat. Add fish and cook 2 to 3 minutes per side, until fork-tender.
Heat remaining oil in a small skillet over high heat. Add prosciutto and cook 2 minutes, until golden brown. Add pine nuts and cook 1 minute, until nuts are golden brown. Add chard leaves, cover and steam 2 minutes, until leaves soften. Arrange chard mixture on a serving platter and top with Gorgonzola and serve with tilapia.
Grilled Chicken with Basil Dressing
 Thanks to my friend Carrie, I am the proud owner of a recipe that is simply divine. It's so good that I thought about cloaking it under the guise of a secret family recipe. But, I'm feeling generous, so here it is.
Grilled Chicken with Basil Dressing
2/3 cup extra virgin olive oil
3 tbsp plus 1/4 cup lemon juice (about four lemons)
1 1/2 tsp fennel seeds, coarsely crushed
1 1/2 tsp salt, plus more to taste
1 tsp freshly ground black pepper, plus more to taste
6 boneless, skinless chicken breast halves
1 cup lightly packed fresh basil leaves
1 large garlic clove
1 tsp grated lemon zest
In resealable plastic bag, combine 1/3 cup of the oil, 3 tbsp of the lemon juice, fennel seeds, 3/4 tsp of the salt and 1/2 tsp of the pepper. Add chicken and seal the bag. Massage the marinade into the chicken. Refrigerate for at least 30 minutes and up to 24 hours, turning the chicken occasionally.
Meanwhile, in a blender, blend basil, garlic, lemon zest, remaining 1/4 cup lemon juice 3/4 tsp salt and 1/2 tsp pepper until smooth. Gradually blend in the remaining 1/3 cup oil. Season the basil sauce to taste with more salt and pepper, if desired.
Prepare a charcoal or gas grill for medium-high heat or preheat a ridged grill pan over medium-high heat. Grill the chicken until just cooked through, about 5 minutes per side. Transfer chicken to a platter. Drizzle with basil sauce and serve.
The recipe is a favorite in our house. I wish I could say it was Carrie's original creation. Alas, it comes from a cookbook called The Italian Grill. It also works well with sweet onions and mushrooms on kebab sticks.
Creme Bruleed French Toast
I saw a version of this recipe on the Today Show in February 2008 and knew I had to give it a whirl. Anything with creme brulee in the title has to be good, right? I'm not typically a huge French toast fan, but I could eat this every day of the week (of course, I would need a huge clothing allowance to compensate for the expanding waistline that goes along with such a decadent dish). I've served it multiple times, with rave reviews each time. Because I don't drink, I substitute a teaspoon of almond or orange extract (at most) for the Grand Marnier. I also add a liberal amount of ground cinnamon to the milk-egg mixture before it's poured over the bread.
Baked Creme Brulee French Toast
Preparation
Preheat oven to 350° F. and bring bread to room temperature.
Bake bread mixture, uncovered, in middle of oven until puffed and edges are pale golden, 35 to 40 minutes (longer if you increases the number of servings).
Serve hot French toast immediately.
Lanna's notes: You can also cube the bread instead of slicing it. It's easier to serve and eat if it's cubed. However, if you do, you'll need to increase your liquid because you'll fit more than 10 pieces in the pan. I use 7 or 8 eggs and 2 cups of milk or half-and-half to get the right amount of liquid. There should be enough liquid so that some will soak into each piece of bread.
Baked Creme Brulee French Toast
Ingredients
1 stick (1/2 cup) unsalted butter
1 cup packed brown sugar
2 tablespoons corn syrup
1 loaf country-style or French bread
5 large eggs
1 1/2 cups half-and-half
1 teaspoon vanilla
1 teaspoon Grand Marnier
1/4 teaspoon salt
1 cup packed brown sugar
2 tablespoons corn syrup
1 loaf country-style or French bread
5 large eggs
1 1/2 cups half-and-half
1 teaspoon vanilla
1 teaspoon Grand Marnier
1/4 teaspoon salt
Preparation
In a small heavy saucepan melt butter with brown sugar and corn syrup over moderate heat, stirring, until smooth and pour into a 13- by 9- by 2-inch baking dish. Cut 1-inch thick slices of bread, reserving ends for another use. Arrange bread slices in one layer in baking dish, squeezing them slightly to fit. (I fit 10 pieces.)
In a bowl whisk together eggs, half-and-half, vanilla, Grand Marnier, and salt until combined well and pour evenly over bread. Chill bread mixture, covered, at least 8 hours and up to 1 day.Preheat oven to 350° F. and bring bread to room temperature.
Bake bread mixture, uncovered, in middle of oven until puffed and edges are pale golden, 35 to 40 minutes (longer if you increases the number of servings).
Serve hot French toast immediately.
Lanna's notes: You can also cube the bread instead of slicing it. It's easier to serve and eat if it's cubed. However, if you do, you'll need to increase your liquid because you'll fit more than 10 pieces in the pan. I use 7 or 8 eggs and 2 cups of milk or half-and-half to get the right amount of liquid. There should be enough liquid so that some will soak into each piece of bread.
Strumboli
When I was in college, my friend Kris McFadden made this recipe for me when I needed cheering up. As long as you don't think about the caloric intake, it'll make you happy.
Strumboli
Dough
2/3 cup water
1 1/2 tsp yeast
1 tbs powdered milk
2 tbs sugar
1 tbs butter
1 1/2 cup flour
Pinch salt
Combine ingredients. Knead and rise 1 hour 20 minutes. Roll out into rectangle.
Filling
1/2 lb mozzarella, grated or sliced
1/4 lb provolone, grated or sliced
1/2 lb crumbed ground sausage, cooked
Pepperoni to liking
Canadian bacon to liking
1. Preheat oven to 425.
2. Place cheeses and meats evenly in middle of dough. Fold over sides and ends. Seal. Slit the top.
3. Cook 12 to 15 minutes.
Cook’s notes: The dough is somewhat sweet, which helps offset the saltiness of the filling. The dough will be very sticky. I usually double the dough recipe and add extra flour. Gauge the stickness. It shouldn't stick to your fingers more than just a tad. Check your yeast measurement. A packet holds more than 1 1/2 tsp yeast.
This also works with prosciutto and other cheese blends. Try smoked mozzarella for a smokier flavor. I grease the pan slightly. You could serve a marinara dipping sauce on the side, but don't put it inside.
Spicy Chicken with Olives
This is an adaptation of a recipe from Bon Apetite. The original calls for anchovies as part of the sauce, but since I don't know too many people who like anchovies, I have never made this recipe with them. This is my alternate version, which has been a hit with my husband, family and friends. Bon apetite!
Spicy Chicken with Olives
2 tbsp (1/4 stick) margarine
1 1/2 tbsp olive oil
3 large garlic cloves, pressed
1/2 tsp dried red pepper flakes
1 pound boneless chicken breast, skinned and cut into 1-inch chunks
3/4 cup dry white wine
2 tbsp capers
1/2 cup small black pitted olives, drained
1/2 tsp dried oregano
1/2 pound spaghetti, cooked
1. Melt margarine with olive oil in heavy skillet over medium-high heat. Add garlic and pepper flakes; cook 1 minute (be careful, garlic burns quickly).
2. Add chicken and sauté until lightly browned on all sides, about 5 minutes.
3. Add wine, olives, capers and oregano and stir until chicken is just cooked through, 2 to 3 minutes.
4. Arrange cooked spaghetti on platter and spoon chicken over. Garnish with chopped tomatoes. Serve immediately.
Lanna’s notes: It helps to toss the spaghetti with a little olive oil so it doesn’t become sticky. Also, if you like the sauce, consider increasing the liquid portions of the recipe. The wine will cook off very quickly, so you really don’t have much sauce. Be careful, though, because you want to sauté the chicken in the sauce, not boil it, which will change your consistency to something less than desirable. The goal is to get a nice brown crust on the chicken. The olives soak up a lot of the flavor. If you're not a big fan of spicy foods, go light on the pepper. A little really goes a long way in this recipe.
Oven Caramel Corn
Winter seems the perfect time for caramel corn, so here's a favorite stand-by we enjoy in my family. I always double the caramel, so that's what I've done here. In other words, don't double the caramel in this recipe or else your popcorn will drown:
Oven Caramel Corn
Approx. 15 cups popped corn (3/4 full turkey pan)
1 cup butter
1/2 cup Caro syrup
2 cups brown sugar
1 tsp. salt
1 tsp. baking soda
Pop the corn in an air popper and set aside (remove any unpopped seeds). This works best using a turkey pan. Preheat oven to 200 degrees.
In heavy saucepan, melt butter, then add Caro syrup, sugar and salt. Stir over medium heat until bubbly around edges. Cook for five more minutes, stirring constantly. Remove from heat and add baking soda. Stir quickly until mixture foams and expands. Pour caramel over popcorn and stir popcorn to coat.
Bake for one hour, stirring every 15 minutes. After it cools, store in airtight container (if it lasts that long).
Enjoy!
Tomato-Balsamic Soup
This soup is some of the most amazing soup I've ever tasted. If you're looking for restaurant-quality tomato soup, this is IT! It's better than the soup at Think Bistro in San Pedro, Calif. (and I didn't think anything could beat that). So, when the weather turns cool and you're craving something better than Campbell's, try this.
Creamy Tomato-Balsamic Soup
Cooking the vegetables at the high temperature of 500° caramelizes their natural sugars and deepens their flavor; the liquid poured over them ensures they won't burn. Prepare the soup up to two days ahead; reheat over medium heat before serving. (Lanna's note: You can also buy fire-roasted canned tomatoes. I'd still roast them according to these directions. I only use 3/4 of the tomatoes required in this recipe. Also, use good quality balsamic vinegar. I recommend the Olivier brand at Williams Sonoma. If you want a hint of a kick, give it a dash or two of cayenne when you blend everything together.)
1 cup less-sodium beef broth, divided
1 tablespoon brown sugar
3 tablespoons balsamic vinegar
1 tablespoon low-sodium soy sauce
1 cup coarsely chopped onion
5 garlic cloves
2 (28-ounce) cans whole tomatoes, drained
Cooking spray
3/4 cup half-and-half
Cracked black pepper (optional)
Yield: 4 servings (serving size: about 1/2 cup)
CALORIES 120 (35% from fat); FAT 4.7g (sat 3g,mono 1.5g,poly 0.1g); IRON 1.7mg; CHOLESTEROL 23mg; CALCIUM 120mg; CARBOHYDRATE 14.9g; SODIUM 452mg; PROTEIN 3.8g; FIBER 1.7g
Cooking Light, OCTOBER 2005
Creamy Tomato-Balsamic Soup
Cooking the vegetables at the high temperature of 500° caramelizes their natural sugars and deepens their flavor; the liquid poured over them ensures they won't burn. Prepare the soup up to two days ahead; reheat over medium heat before serving. (Lanna's note: You can also buy fire-roasted canned tomatoes. I'd still roast them according to these directions. I only use 3/4 of the tomatoes required in this recipe. Also, use good quality balsamic vinegar. I recommend the Olivier brand at Williams Sonoma. If you want a hint of a kick, give it a dash or two of cayenne when you blend everything together.)
1 cup less-sodium beef broth, divided
1 tablespoon brown sugar
3 tablespoons balsamic vinegar
1 tablespoon low-sodium soy sauce
1 cup coarsely chopped onion
5 garlic cloves
2 (28-ounce) cans whole tomatoes, drained
Cooking spray
3/4 cup half-and-half
Cracked black pepper (optional)
Preheat oven to 500°.
Combine 1/2 cup of broth, sugar, vinegar, and soy sauce in a small bowl. Place onion, garlic, and tomatoes in a 13 x 9-inch baking pan coated with cooking spray. Pour broth mixture over tomato mixture. Bake at 500° for 50 minutes or until vegetables are lightly browned.
Place tomato mixture in a blender. Add remaining 1/2 cup broth and half-and-half, and process until smooth. Strain mixture through a sieve into a bowl; discard solids. Garnish with cracked black pepper, if desired.
(One more Lanna note: I don't bother straining the mixture. It's too thick to strain easily. Besides, it's more filling this way. I made homemade croutons from week-old sourdough bread from Panera and topped the soup with it. Fabulous!)Yield: 4 servings (serving size: about 1/2 cup)
CALORIES 120 (35% from fat); FAT 4.7g (sat 3g,mono 1.5g,poly 0.1g); IRON 1.7mg; CHOLESTEROL 23mg; CALCIUM 120mg; CARBOHYDRATE 14.9g; SODIUM 452mg; PROTEIN 3.8g; FIBER 1.7g
Cooking Light, OCTOBER 2005
Cream of Any Green Soup
Cream of Any Green Soup
(serves six)
1 tbsp oil
1/2 cup onion, chopped
4 cups chicken stock
1/4 cup butter/margarine
1/4 cup flour
1/2 tsp salt
1/4 tsp white pepper
3 cups milk or half and half
1. Heat oil in large saucepan and saute onion over medium-low heat until soft but not brown, about 5 minutes. Add chicken stock, vegetables and appropriate seasonings. Simmer over medium heat until vegetables are tender. (Timing will vary depending upon the vegetable. Broccoli and cauliflower will take longer than asparagus, peas, artichokes and spinach.) When vegetables are soft, place about 1/3 of the soup mixture in a blender or processor with metal blade inserted and process until mixture is smooth. Repeat with remaining soup until all is pureed. Stir in appropriate cheese or ham, cover and set aside.
2. Melt butter in a heavy, 8-quart pot over medium-low heat. Slowly blend in flour, salt and white pepper. Cook, stirring to form a smooth paste, just until mixture starts to turn golden. Add milk slowly, stirring constantly. Cook until mixture thickens. Add vegetable puree and cook, stirring, until heated through.
3. Ladle soup into bowls, garnish and serve immediately.
Options
Artichoke
2 1/4 cups artichoke hearts, rinsed
chopped parsley for garnish
Asparagus
5 cups asparagus, cut into 1-inch pieces
1 1/2 tsp lemon juice
1/4 tsp tarragon leaves, crumbed
Broccoli
5 cups broccoli florets
1 tsp thyme, crumbled
1/2 cup Gruyere cheese, grated
Additional Gruyere for garnish
Cauliflower
5 cups cauliflower florets
3/4 tsp curry
1 cup cheddar cheese, shredded
chopped chives for garnish
Pea
4 cups fresh or frozen peas
1/4 cup shredded lettuce
1 1/4 cups cooked ham, diced
chopped chives for garnish
Spinach
6 cups spinach leaves, packed
1/4 tsp nutmeg
chopped chives for garnish
Gratin of Cauliflower with Gruyere
I love Cooking Light magazine. And, it's not because the article I wrote for them back in 2005 entirely paid for my wedding (although it did ... really!). The recipes are amazingly good. They're high in flavor without being high in calories. That's what I call a win-win. Anyhow, I'd been meaning to try the following recipe. The weather here has turned really cold (we're dropping to the teens at night) and windy, so my taste buds scream for comfort food.
I have never particularly liked potatoes au gratin (thanks to Betty Crocker and boxes of dehydrated potatoes from my childhood). But, this made-from-scratch version is decadent. I halved the recipe and used asiago fresco since I didn't have gruyere. (Note, I did not halve the panko topping. And, I used a bag of frozen cauliflower instead of fresh.) My husband, who isn't a big fan of cauliflower unless it's mashed, liked this recipe. It's easy to prepare and is loaded with flavor (depending on the cheese you use). Enjoy!
 Gratin of Cauliflower with Gruyère
Gruyère's nutty, earthy flavor is a nice match for subtle cauliflower, and crisp breadcrumbs add texture. Substitute broccoli for the cauliflower, if you prefer. You can prepare all the elements for the dish a day ahead, if necessary. Refrigerate the sauce, the cauliflower, and the breadcrumb mixture separately, and simply assemble before baking.
RECIPE INGREDIENTS
1 medium head cauliflower, trimmed and cut into florets (about 2 pounds)
Cooking spray
1/2 teaspoon kosher salt, divided
2 teaspoons butter
1/3 cup panko (Japanese breadcrumbs)
1/2 cup (2 ounces) shredded Gruyère cheese, divided
2 tablespoons finely chopped fresh chives
1/2 cup finely chopped onion
1 garlic clove, minced
3 tablespoons all-purpose flour
2 cups 2% reduced-fat milk
3 tablespoons chopped fresh flat-leaf parsley
1/4 teaspoon freshly ground black pepper
RECIPE INSTRUCTIONS
1. Preheat oven to 400°.
2. Place cauliflower in a 2-quart broiler-safe baking dish lightly coated with cooking spray; coat cauliflower with cooking spray. Sprinkle with 1/4 teaspoon salt; toss. Bake at 400° for 30 minutes or until almost tender. Cool 5 minutes.
3. Preheat broiler.
4. Melt butter in a saucepan over medium heat. Remove from heat. Stir in panko. Stir in 1/4 cup cheese and chives.
5. Heat a medium saucepan over medium-high heat. Coat pan with cooking spray. Add onion to pan; sauté 4 minutes or until almost tender, stirring frequently. Add garlic; sauté 1 minute, stirring constantly. Add flour; cook 1 minute, stirring constantly. Gradually add milk, stirring with a whisk; bring to a boil. Cook 3 minutes or until thick, stirring constantly. Remove from heat; stir in remaining 1/4 cup cheese, remaining 1/4 teaspoon salt, parsley, and pepper. Pour milk mixture over cauliflower mixture; toss. Top evenly with cheese mixture. Broil 3 minutes or until golden brown and thoroughly heated.
Yield: 6 servings (serving size: 2/3 cup)
CALORIES 161 (34% from fat); FAT 6g (sat 3.6g,mono 1.7g,poly 0.3g); IRON 1mg; CHOLESTEROL 20mg; CALCIUM 233mg; CARBOHYDRATE 18g; SODIUM 295mg; PROTEIN 9.7g; FIBER 3.6g
I have never particularly liked potatoes au gratin (thanks to Betty Crocker and boxes of dehydrated potatoes from my childhood). But, this made-from-scratch version is decadent. I halved the recipe and used asiago fresco since I didn't have gruyere. (Note, I did not halve the panko topping. And, I used a bag of frozen cauliflower instead of fresh.) My husband, who isn't a big fan of cauliflower unless it's mashed, liked this recipe. It's easy to prepare and is loaded with flavor (depending on the cheese you use). Enjoy!
Gratin of Cauliflower with GruyèreGruyère's nutty, earthy flavor is a nice match for subtle cauliflower, and crisp breadcrumbs add texture. Substitute broccoli for the cauliflower, if you prefer. You can prepare all the elements for the dish a day ahead, if necessary. Refrigerate the sauce, the cauliflower, and the breadcrumb mixture separately, and simply assemble before baking.
RECIPE INGREDIENTS
1 medium head cauliflower, trimmed and cut into florets (about 2 pounds)
Cooking spray
1/2 teaspoon kosher salt, divided
2 teaspoons butter
1/3 cup panko (Japanese breadcrumbs)
1/2 cup (2 ounces) shredded Gruyère cheese, divided
2 tablespoons finely chopped fresh chives
1/2 cup finely chopped onion
1 garlic clove, minced
3 tablespoons all-purpose flour
2 cups 2% reduced-fat milk
3 tablespoons chopped fresh flat-leaf parsley
1/4 teaspoon freshly ground black pepper
RECIPE INSTRUCTIONS
1. Preheat oven to 400°.
2. Place cauliflower in a 2-quart broiler-safe baking dish lightly coated with cooking spray; coat cauliflower with cooking spray. Sprinkle with 1/4 teaspoon salt; toss. Bake at 400° for 30 minutes or until almost tender. Cool 5 minutes.
3. Preheat broiler.
4. Melt butter in a saucepan over medium heat. Remove from heat. Stir in panko. Stir in 1/4 cup cheese and chives.
5. Heat a medium saucepan over medium-high heat. Coat pan with cooking spray. Add onion to pan; sauté 4 minutes or until almost tender, stirring frequently. Add garlic; sauté 1 minute, stirring constantly. Add flour; cook 1 minute, stirring constantly. Gradually add milk, stirring with a whisk; bring to a boil. Cook 3 minutes or until thick, stirring constantly. Remove from heat; stir in remaining 1/4 cup cheese, remaining 1/4 teaspoon salt, parsley, and pepper. Pour milk mixture over cauliflower mixture; toss. Top evenly with cheese mixture. Broil 3 minutes or until golden brown and thoroughly heated.
Yield: 6 servings (serving size: 2/3 cup)
CALORIES 161 (34% from fat); FAT 6g (sat 3.6g,mono 1.7g,poly 0.3g); IRON 1mg; CHOLESTEROL 20mg; CALCIUM 233mg; CARBOHYDRATE 18g; SODIUM 295mg; PROTEIN 9.7g; FIBER 3.6g
Subscribe to:
Posts (Atom)